
Play Futoshiki Puzzles Online
In the following tutorial, basic and advanced techniques for solving Futoshiki puzzles are presented step by step, with accompanying illustrations to show-case the methods on specific board configurations.
The starting point for reaching a solution is the definition of the game itself: Futoshiki requires the user to find out a board where every digit appears once on every row and column, by respecting the board's inequalities. By using this criterion, progress towards a solution can be made by completing, step by step, empty board squares with specific digits because they are the only way to respect the board's restrictions.
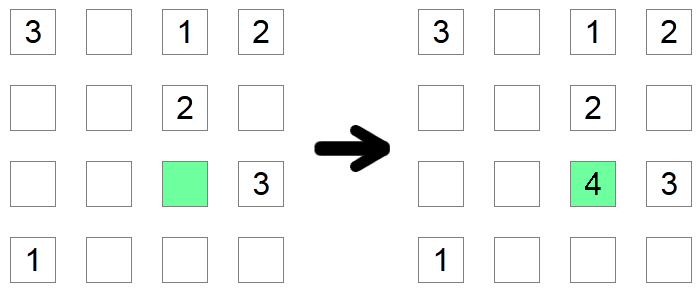
If a square's column and row already contain all possible digits, except one, then that square must contain the missing digit. In the example above, the green square must be 4 since it would not be allowed to have any other value as the other possible digits are already found in its row or its column.
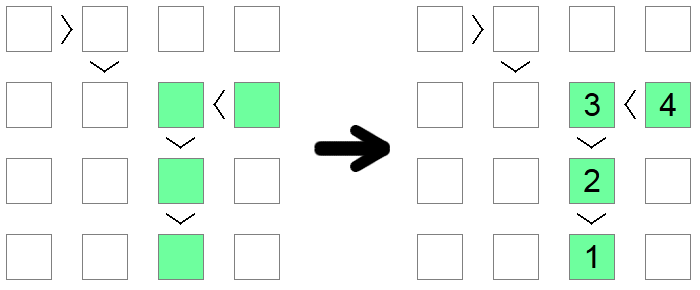
If you notice a chain of inequalities, be it either < (all ascending) or > (all descending), equal in size with the board's size, then that chain must be a sequence from 1 up to the length of the board. The length of the chain guarantees that this sequence is the only possible solution that satisfies the monotone condition imposed by the inequality chain.
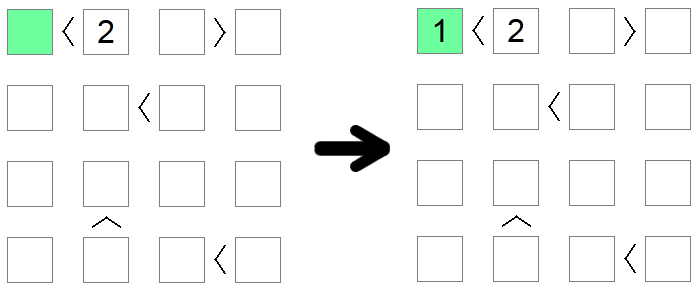
Squares that are less than 2 must implicitly have the value 1 as it is the only admissible value on the board which respects that condition. Similarly, squares that are greater than the board size minus 1 must be equal to the board size. In the example above, the only possible value for the green square (less than 2) is 1.
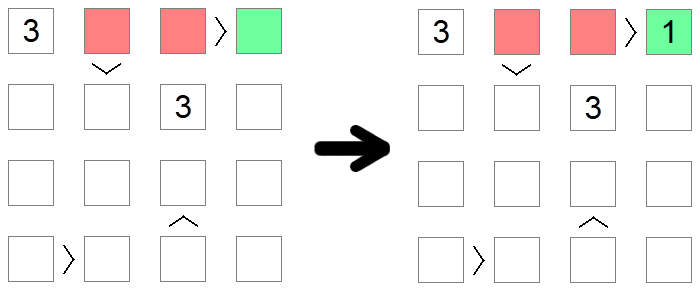
Squares that are greater than other squares cannot be 1, the lowest value allowed on the board, as there is no value smaller than 1. Similarly, squares that are lower than other squares cannot contain the max allowed value, as there would be nothing greater to be filled on the other side of the inequality. In the example above, 1 cannot be filled in the red squares as they are all greater than other board squares, so the only possible placement for 1 on the first row of the board is the green square.
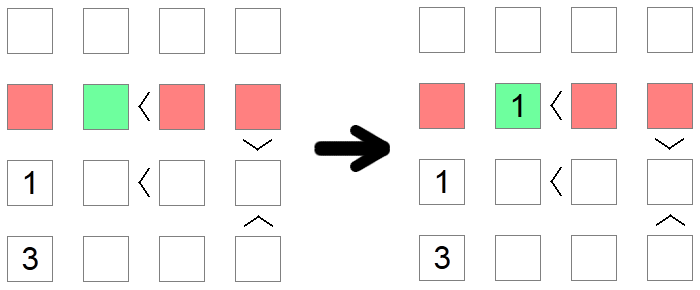
Sometimes multiple rules must be used in order to reach a conclusion. This is the case in the example above, where we try to place the value 1 on the second row of the board. The first red square is eliminated due to a column exclusion (we already have a 1 on that column), while the second and third red squares are eliminated due to an exclusion of min values as those places have 'greater than' inequalities associated with them. Therefore the green square remains the only possible place for placing 1 in that row.
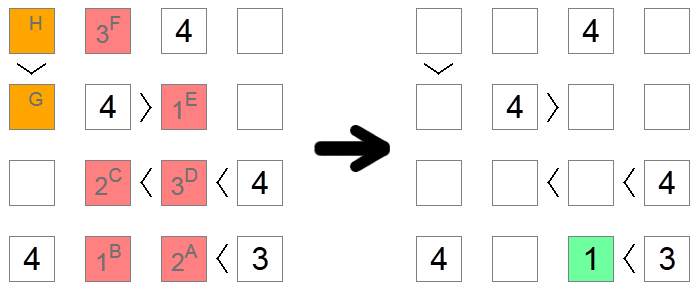
Sometimes, especially on difficult boards, there are no other ways to figure out the correct digit for a square except for diving into the implications of each possibility until a contradiction is reached. In the example above, all red and orange squares are initially blank. We want to figure out if the square A contains 1 or 2. We assume that it contains 2 and we check to see if we reach a contradiction based on this assumption.
If square A has a 2, then square B would have a 1 (the only remaining value on the bottom row). Square C can be 1 or 2 as it has a chain of inequalities that requires to have available 2 greater numbers, but now it cannot be 1 due to the column exclusion of square B, so square C is a 2, and square D is a 3 (the only value between 2 and 4). Due to column exclusions, square E is 1 and square F is 3.
Now, if we look at the orange squares, we notice the contradiction: if square G were to be 2, square H would have to be either 3 or 4, which are not allowed due to a row exclusion. If square G were to be 3, square H would have to be 4 which is not allowed due to the same reason. As we no longer have remaining values for square G, it means that we reached a deadlock and our initial assumption was wrong: 2 is not a valid move for square A, so we can go ahead and place 1 in it, the only other possible value.
We have shown above how to solve a Futoshiki puzzle successfully by covering a range of techniques that can help you deduce the next move even in difficult situations. The other key ingredient for becoming proficient and fast at solving Futoshiki puzzles is experience: the more you practice, the better and faster you'll become.
If you're up for a challenge, you can play right now a random Futoshiki puzzle by clicking the button below. Good luck!
© 2024 - All rights reserved - About - Privacy Policy - DE | EN | ES | FR | IT | LV | NL | PL | PT | RO | SV | TR